Metal Roofing Screw Size Chart: Diameters, Lengths and Applications Explained
Key Takeaways
- Screw gauge refers to the shank diameter, not the head. Common roofing sizes step up as #9 (0.171″), #10 (0.190″), #12 (0.216″), and #14 (0.250″). A higher number means a larger diameter and greater holding strength.
- Length is measured from the underside of the head to the tip. For roofing and siding, plan on at least 1″ of penetration into the substrate to meet pull-out strength needs.
- Threads per inch (TPI) also factor in. Coarse threads (about 10 to 14 TPI) are matched to metal-to-wood. Fine threads (about 20 to 24 TPI) are matched to metal-to-metal.
- #10 screws are the go-to size for residential exposed-fastener metal roofing on wood. #12 is the heavier-duty bump (often used for steel purlins when specified with a self-drilling Tek point, and for windier locations). #14 delivers the most holding power among standard residential sizes.
- For corrugated panels, use this quick rule: screw length = panel corrugation height + 1″ minimum penetration. Example: 7/8″ corrugated usually takes a 2″ screw.
- On exposed-fastener panels (corrugated and R-panel), drive through the flat/low of the panel, not the rib/high. That keeps the washer fully supported and reduces leak risk over time.
- Self-drilling Tek screws pair with metal-to-metal work. Type 17 (self-piercing) is the standard for metal-to-wood. Pre-drilled self-tapping screws are uncommon in modern roofing.
- Choose EPDM sealing washers for long UV life (20 to 30 years). Neoprene hardens and cracks sooner and isn’t recommended for new installs.
- Don’t put another #10 in a stripped hole. Step up one gauge (#10 → #12) so the threads bite fresh material and restore grip.
- Consider the coating. Inland jobs do well with galvanized or color-coated carbon steel. In coastal or corrosive settings, use 304/316 stainless or bi-metal screws. For top-tier longevity, ZAMAC 5 dome caps shield EPDM from UV for 40+ years.
- A common starting point is about 80 screws per roofing square (100 square feet) on wood substrates. High-wind zones often tighten spacing (6″ to 12″ on-center). Follow your local code and an engineer’s layout.
- Supply Maverick carries the hard-to-find fasteners pros actually use and ships most orders placed before 12 p.m. EST the same day. You’ll also find bulk-quantity discounts and Net 30 accounts for qualified buyers.
Understanding Metal Roofing Screws: Why Size Matters
A roofing screw does more than keep a panel from lifting. It has to match the panel profile, substrate, weather exposure, and fastening plan so the connection stays secure and sealed over time.
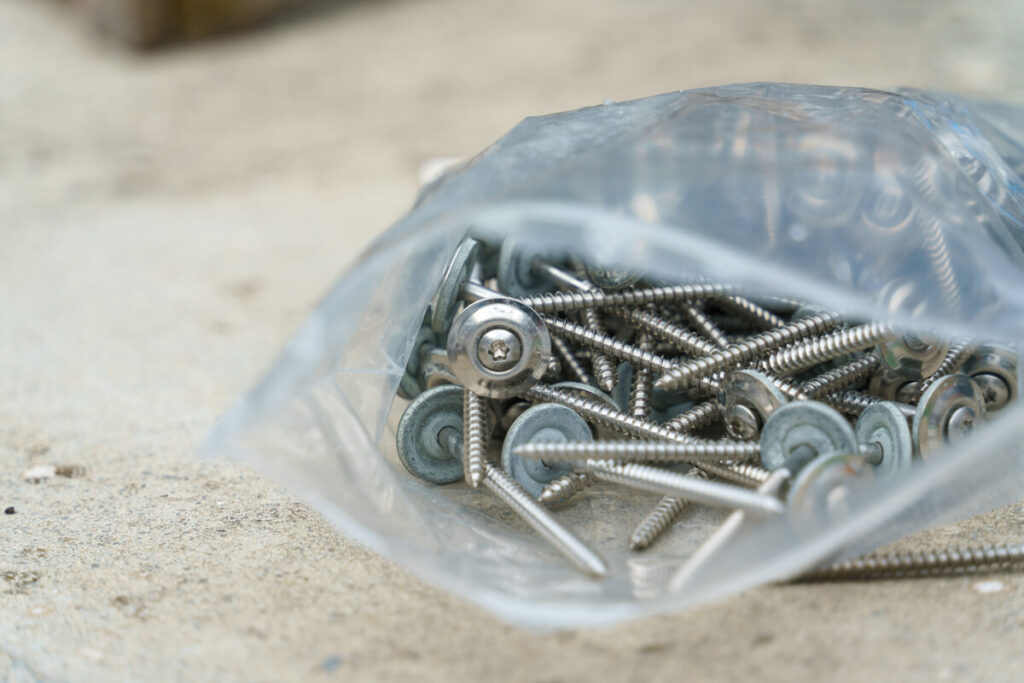
The Anatomy of a Metal Roofing Screw
A roofing screw combines several integrated features that clamp the panel, seal out water, and resist wind uplift in concert.
- Head: Drive style and bearing surface start here. For exposed-fastened roofing and siding, the hex washer head is standard because it gives positive driver engagement and spreads load while compressing the washer evenly. Concealed-fastener systems (like standing seam clipped panels) rely on low-profile pancake heads so seams close cleanly without telegraphing a bump.
- Sealing washer: An ethylene propylene diene monomer (EPDM) washer is bonded to the underside of the head so it stays put. As you tighten, EPDM compresses uniformly to keep water out and remains elastic in sun and weather for 20 to 30 years. Neoprene dries and cracks much sooner, so skip it on new work.
- Shank and threads: The shank sets the core diameter. Thread geometry and density (threads per inch) are tuned to wood or metal. Coarse threads (about 10 to 14 TPI) let wood fibers compress and grab; fine threads (about 20 to 24 TPI) form clean threads in steel purlins and framing.
- Point: Match the point to the substrate. Type 17 points are sharp, self-piercing tips that cut their own pilot for metal-to-wood fastening. Tek points are self-drilling tips that act like micro drill bits for metal-to-metal. They’re graded #1 to #5 by the thickness of steel they can drill.
- Coating/material: Options include galvanized, color-coated, stainless (304 or 316), and bi-metal. Choose based on environment (inland vs. coastal), panel material, and service-life targets. Premium ZAMAC 5 dome caps cover the EPDM washer to block UV for decades.
The Three Critical Specifications
Every metal roofing screw spec boils down to three items. Nail these, and you’re set.
- Diameter (gauge): This is the shank diameter, not the head. Larger gauges typically increase pull-out capacity and shear strength. Common roofing gauges include #9 (0.171″), #10 (0.190″), #12 (0.216″), and #14 (0.250″). As gauge increases, so does suitability for higher loads and wind exposure.
- Length: Measured from the underside of the head to the tip. Aim for at least 1″ of penetration into the substrate (wood or equivalent). Too short leaves little engagement; too long invites over-torque, snapped shafts, or crushed washers. Account for corrugation height and any layers you pass through.
- Threads per inch (TPI): Match TPI to the substrate. Coarse (about 10 to 14 TPI) grips wood without shredding fibers. Fine (about 20 to 24 TPI) taps steel accurately. Using the wrong thread profile weakens hold and can strip the base material.
Why Screw Size Affects Roof Performance
Pick the size thoughtfully, and your roof will shrug off day-to-day stress more reliably.
- Holding power and uplift resistance: Larger diameters (#12 and #14) increase tensile and pull-out strength. When gusts hit and panels try to lift, diameter and embedded length are crucial. Typical tensile values run around 2,500 lbs (#9), 2,900 lbs (#10), 3,600 lbs (#12), and roughly 4,500 lbs (#14), depending on the manufacturer.
- Watertight seal quality: Washers seal best in the flats of the panel. Choose a length that provides 1″ of penetration without bottoming out. Over- or under-driving compromises EPDM and can produce mystery leaks.
- Fatigue and thermal cycling: Roofs expand, contract, and vibrate. The right gauge and thread pitch maintain clamp load through those cycles. Undersized screws or mismatched threads back out sooner, especially when fastened into ribs instead of flats.
- Repair and replacement: Don’t swap like-for-like into a wallowed hole. Stepping up one gauge (#10 → #12, or #12 → #14) is the standard fix to regain bite and re-establish a tight seal.
Standard Screw Sizes at a Glance
Treat gauge like your fastening “horsepower.” Here’s how common sizes stack up, plus where they’re typically used and what performance to expect.
- #9 (0.171″ shank) — Light-duty choice for thinner panels over wood purlins. Good for agricultural buildings, sheds, and light residential where loads stay modest. Approximate tensile strength: 2,500 lbs. Typical lengths: 1″, 1-1/2″.
- #10 (0.190″ shank) — Widely used on residential exposed-fastener roofing over wood (corrugated and R-panel). Strong performance at good value and easy to source. Approximate tensile strength: 2,900 lbs. Common lengths: 1″, 1-1/2″, 2″.
- #12 (0.216″ shank) — A heavier-duty step up, often called for on steel purlins, in high-wind zones, and for replacements in enlarged holes. About 24% more tensile than #10. Approximate tensile strength: 3,600 lbs. Common lengths: 1″, 1-1/2″, 2″, 2-1/2″.
- #14 (0.250″ shank) — The top holding power for standard residential categories. Suited to severe wind exposure or compromised substrates. Requires careful driving. Approximate tensile strength: 4,500 lbs. Common lengths: 1-1/2″, 2″, 2-1/2″.
- #15 (~0.260 to 0.265″ shank) — Specialty fasteners for extreme uplift (high-velocity hurricane zone (HVHZ)/Miami-Dade and some Factory Mutual (FM)-approved assemblies). Expect 30 to 40% stronger pull-out than #12. Use only when the assembly specifies it.
Remember, shank diameter, not head size, defines the gauge. If you switch brands, confirm spec sheets. Two similar-looking screws can have very different engineering values.
Understanding Screw Length Requirements
Start with the “1-inch rule” for penetration, then layer on panel height and anything else in the stack, like underlayment, insulation, or furring.
- Identify the panel thickness at the fastener location (use corrugation height if you’re fastening in the low).
- Add at least 1″ for minimum penetration into the structural substrate.
- Add any other layers the screw must pass through (strapping, foam insulation, nail base, and similar materials).
Examples:
- 1/2″ corrugated panel over 5/8″ oriented strand board (OSB): 1/2″ (panel low) + 1″ (penetration) = 1-1/2″ minimum screw.
- 7/8″ corrugated over 2×4 purlins: 7/8″ + 1″ = 1-7/8″. Choose a 2″ screw for consistent bite and washer compression.
- R-panel (1.5″ rib) fastened in the flat: Because you’re driving in the flat, not the 1.5″ rib, 1″ to 1-1/2″ screws are common for direct-to-wood. Confirm flat thickness where the fastener sits.
Picking the right length also helps avoid two common mistakes:
- Too short: The threads barely catch the framing, leaving weak engagement that backs out and leaks.
- Too long: Drivers tend to over-torque longer screws, risking snapped shanks or crushed EPDM washers.
Threads Per Inch (TPI) and Thread Pitch
Thread pitch is about matching the material and getting dependable grip.
- Metal-to-wood (coarse): About 10 to 14 TPI lets wood fibers move and lock around the threads. Roofing screws here often use a sharp Type 17 point to pierce light-gauge metal and bite wood without a pilot hole.
- Metal-to-metal (fine): About 20 to 24 TPI is designed to tap into steel purlins or framing. Match with the right Tek drill point for the total thickness of metal you’ll penetrate.
- Hybrid shapes: Some screws use specialized thread forms for composites or insulated panels. Prioritize a drill point and TPI that match the substrate, then refine coating and head style.
Metal Roofing Screw Sizes Explained: Common Gauges and Applications
Use this metal roofing screw size chart to narrow down the right gauge, length, and thread configuration before you place an order. The figures below provide a practical starting point, but always confirm the panel manufacturer’s specifications and local code requirements for the project.
#9 Screws (0.171″ Diameter)
#9 roofing screws sit at the light-duty end. With a 0.171″ shank, they drive quickly and work well on agricultural and light residential projects that don’t face intense wind uplift. Think equipment sheds, lean-tos, small barns, and utility roofs where spans are short and exposure is moderate.
Typical Use Cases
- Thin corrugated panels attached to wood purlins.
- Agricultural buildings with sheltered exposure.
- Pole barns where code pull-out requirements are lower and framing spans are tight.
Relevant Specs
- Diameter: 0.171″ (#9).
- Lengths: 1″ and 1-1/2″ are common for single-layer corrugated over wood. Follow the 1″ penetration guideline.
- Threads: Coarse thread (~10 to 14 TPI) for wood with a self-piercing Type 17 point.
- Tensile strength: About 2,500 lbs.
Pro Tips
- If panels oil-can or gusts are frequent, move up to #10 for more hold.
- Stick with EPDM-washered heads. Neoprene ages fast in UV, especially on low-slope farm roofs where water can linger after storms.
#10 Screws (0.190″ Diameter): the Industry Standard
For many residential exposed-fastener roofs, #10 is the default. At 0.190″ diameter, the balance of cost, performance, and availability is hard to beat. You’ll see them on corrugated and R-panel installs over plywood, oriented strand board (OSB), or wood purlins. If you’re outfitting a typical home, this size is usually the right starting point unless wind design pressures push you higher.
Typical Use Cases
- Corrugated and R-panel roofing attached to wood sheathing or wood framing.
- Metal siding secured to wood girts.
- Re-roofs where the substrate is sound and holes haven’t enlarged.
Relevant Specs
- Diameter: 0.190″ (#10).
- Lengths: 1″, 1-1/2″, and 2″ are most common. Match to panel low + 1″ penetration.
- Threads: Coarse (~10 to 14 TPI) for wood with a Type 17 point for direct drive through light-gauge metal.
- Tensile strength: Around 2,900 lbs.
Pro Tips
- If replacement holes feel sloppy, skip #10s and jump to #12s to grab fresh wood.
- Drive in the flats, not the ribs, to keep the washer fully supported.
Product examples
- #10 Hi-Lo LoGrip Roofing/Siding Screw. Best for corrugated or R-panel over plywood/OSB where you need a clean, color-matched head and reliable EPDM sealing.
#12 Screws (0.216″ Diameter): the Heavy-Duty Standard
When exposure climbs, substrates change, or holes have opened up, #12 often becomes the staple. That 0.216″ diameter delivers roughly 24% more tensile strength than #10 and meaningful pull-out gains. You’ll find #12s on light commercial roofs and exposed sites where wind routinely tests fasteners.
Typical Use Cases
- Metal-to-metal fastening into standard steel purlins (18 to 12 gauge) using a self-drilling Tek point matched to total steel thickness.
- Windier regions where #10 pull-out isn’t enough.
- Replacements for old #10s in enlarged holes.
- Retrofits on older agricultural structures where the lumber has softened.
Relevant Specs
- Diameter: 0.216″ (#12).
- Lengths: 1″, 1-1/2″, 2″, 2-1/2″ for taller corrugations and multilayer assemblies.
- Threads: Fine (~20 to 24 TPI) for metal-to-metal with appropriate Tek points into steel. Coarse-thread versions for wood are available when you need added holding power.
- Tensile strength: About 3,600 lbs.
Pro Tips
- Set your driver clutch on the gentle side. Larger diameters can snap if you lean in too hard, especially in cold weather.
- For coastal projects, spec stainless or bi-metal to avoid corrosion at the head and threads.
Product examples
- Self Drilling/Tapping Metal Roofing Screws — Use a #12 self-drilling Tek screw (typically Tek #3 for 18- to 12-gauge steel purlins) for metal-to-metal applications with no predrilling required when matched to steel thickness.
- #12 ReGrip Replacement Screw Metal to Wood — Step up from #10s into older or softer wood to restore bite and uplift resistance.
#14 Screws (0.250″ Diameter): Maximum Holding Power
For windswept sites, marginal substrates, or storm repairs, #14 fasteners offer the highest clamping force among standard residential sizes. With a quarter-inch shank, they deliver serious bite (so long as installation technique is on point).
Typical Use Cases
- Severe wind zones and hurricane retrofits.
- Replacement where #12s have failed and holes are badly enlarged.
- Exposed locations (ridges, eaves, corners) where uplift peaks.
- Light commercial roofs that need residential-class fasteners with top-end strength.
Relevant Specs
- Diameter: 0.250″ (#14).
- Lengths: 1-1/2″, 2″, and 2-1/2″ are common.
- Threads: Fine for metal-to-metal with Tek points; coarse variants for wood are available when you need extreme grip.
- Tensile strength: Roughly 4,500 lbs.
Pro Tips
- Use experienced installers and correct screw gun settings. Aim for a flat seat and a slight EPDM squeeze, but don’t crush the washer.
- Some commercial or HVHZ designs call for #15 fasteners. Follow the engineered assembly.
Product examples
- #14 FastGrip Replacement Metal Roofing/Siding EPDM Washered — Purpose-built for repairs where #10/#12 screws have loosened in wood; the larger shank re-establishes grip in wallowed holes.
- Self Drilling/Tapping Metal Roofing Screws — For heavier steel or structural members, use #14 self-drilling Tek screws (up to Tek #5 where specified) rated for the total steel thickness.
Screw Length Guide by Panel Type and Substrate
Length is determined by the panel profile and the material below it, not by a one-size-fits-all rule. Use these common applications to calculate enough embedment without choosing a fastener that is unnecessarily difficult to drive.
Corrugated Panel Installations
Corrugated profiles vary, but the same fastening rule applies: go through the flat/low of the corrugation, and pick a length that gives at least 1″ of bite into the structure. That keeps the washer supported, reduces rocking, and limits back-out over time.
Length By Common Corrugations
- 1/2″ corrugated: Use a 1-1/2″ screw minimum (1/2″ panel low + 1″ penetration).
- 7/8″ corrugated: Use a 2″ screw minimum (7/8″ panel low + 1″ penetration ≈ 1-7/8″; 2″ is the practical choice).
Substrate Considerations
- Wood sheathing (OSB/plywood): #10 coarse thread with a Type 17 point is the most common choice.
- Wood purlins: The same #10 coarse thread works well. If wind or older lumber concerns you, #12 coarse thread provides extra hold.
- Steel purlins: For metal-to-metal, use #12 with a Tek #3 point or #14 if design pressures demand more.
Spacing and Pattern
- A residential baseline is about 80 screws per 100 square feet on wood substrates. High-wind zones typically require tighter spacing (often 6″ to 12″) on-center along edges and corners where pressures spike.
- Always follow the panel maker’s fastening pattern and your local code.
Product examples
- #12 ReGrip Replacement Screw Metal to Wood — Step up to #12 in windier sites or older wood purlins where added diameter improves pull-out.
R-Panel Installations
R-panels (often with 1.5″ ribs) are common on residential and light commercial roofs and walls. The principle matches corrugated: drive in the flat so the washer sits flush. Because you’re fastening in the thinner flat, roof and wall applications into wood usually use 1″ to 1-1/2″ screws.
Length and Type
- To wood sheathing or girts: #10 x 1″ to 1-1/2″ coarse thread with a Type 17 point.
- To steel framing: #12 fine thread with a Tek #3 point; choose length by flat thickness and needed penetration into the purlin.
Pattern and Edge Zones
- Perimeters (eaves, ridges, corners) usually need tighter spacing than the field. Follow local wind maps and the panel’s engineering guide.
- Avoid fastening in the rib. The unsupported washer area under a rib eventually leaks after thermal cycling and vibration.
Product examples
- #10 ProZ Aluminum Cap Metal to Wood EPDM Washered Fasteners — Go-to fastener for attaching R-panels to plywood or girts while keeping heads discreetly color-matched.
- Self Drilling/Tapping Metal Roofing Screws — For steel purlins, select #12 self-drilling Tek screws (typically Tek #3 for 18 to 12 gauge) to drive cleanly without predrilling.
Standing Seam Roofing
Standing seam is a concealed-fastener system, so screw sizing shifts to the clips and their attachment to the deck or purlins. These fasteners aren’t directly exposed to weather.
Fastener Selection for Clips
- Low-profile pancake head screws secure clips so the male/female seam can lock without telegraphing.
- Length is often around 1″ when going into wood decks; for steel framing, select self-drilling fine-thread screws with the correct Tek point.
Practical Notes
- Clips carry the structural load. Use the exact clip/fastener combo specified for the panel system, including drill point and thread pitch.
- Even when concealed, choose corrosion protection that fits your environment. Coastal installs often warrant stainless or bi-metal clip fasteners.
Product examples
- #10 Pancake Screws Stainless Steel — Used to fix standing seam clips to plywood/OSB decks without creating a bump under the seam.
- Self Drilling/Tapping Metal Roofing Screws — For steel purlins/framing, use bi-metal or carbon-steel self-drilling pancake-head fasteners with an appropriate Tek point (e.g., Tek #3 to #5 based on total steel thickness).
Metal Siding Applications
Metal siding follows roofing best practices, with an added focus on straight lines and clean visuals. For exposed-fastener siding, go through the low of the panel. For concealed-fastener siding, use pancake head screws.
Length and Type
- Exposed-fastener siding to wood: 1″ screws are common because siding flats are usually thinner than roof flats, and you still want 1″ of wood bite.
- Concealed-fastener siding: 1″ pancake head screws secure panels or clips without creating a bump.
Spacing and Aesthetics
- Keep rows and columns aligned, as misaligned fasteners stand out on walls. A chalk line helps maintain accuracy.
- Siding sees suction in wind too. Tighten spacing near corners and openings per the assembly’s engineering.
Product examples
- #10 Pancake Screws Stainless Steel — Low-profile choice for concealed-fastener siding clips into wood substrates; maintains a flat appearance.
Commercial Metal Decking
Commercial roofs often include steel deck, insulation, cover board, and a top layer (membrane or metal panels). Long self-drilling screws pass through the stack to anchor into deck or purlins, and the details differ from residential work.
Length and Threading
- Common lengths include 6″, 8″, 10″, 12″, and even 16″ for thick insulation stacks.
- Threading and shank design are optimized for steel decks and compressible layers; confirm the assembly’s specified fastener.
Drill Points and Assembly
- Select self-drilling screws with drill points rated for the total steel thickness. Use the appropriate Tek level for deck and top-sheet thickness. Thinner deck may allow a lower-number Tek; heavier steel demands a higher-number tip.
- Follow the engineered assembly: fastener density and patterns vary by perimeter, corner, and field zones.
Product examples
- Self Drilling/Tapping Metal Roofing Screws — Use long, self-drilling deck fasteners (6” to 16″) with Tek #3 to #5 points sized to the deck thickness and assembly requirements.
Screw Specifications Explained: Drill Points, Head Types, and Coatings
Gauge and length are important, but the point, head, coating, and washer determine how the fastener drives, seals, and holds up in the field.
Drill Point Types and Their Applications
Start with the substrate. Once you know what you’re drilling into, the point selection falls into place.
Self-Drilling (Tek) Screws
- Application: Metal-to-metal.
- How they work: A miniature drill bit at the tip cuts a pilot while threads form behind it.
- Ratings: Tek #1 through #5 correspond to the steel thickness they can drill.
- Tek #1: Thin steel (around 22 gauge).
- Tek #3: Typical purlins (about 18 to 12 gauge).
- Tek #5: Up to 1/4″ structural steel (always verify the manufacturer’s capacity).
- Best use: Attaching panels or clips to steel framing, purlins, or metal decking without predrilling.
Self-Piercing (Type 17) Screws
- Application: Metal-to-wood.
- How they work: A sharp, notched tip pierces light-gauge metal and taps into wood fibers without a pilot.
- Best use: Residential exposed-fastener panels over OSB/plywood or wood purlins; siding on wood girts.
Self-Tapping (Pre-Drill) Screws
- Application: Niche scenarios, such as brittle substrates or very thick/hard steels where a controlled pilot is specified.
- Note: Rare in modern metal roofing because Tek and Type 17 points cover nearly all field conditions.
Head Types and Their Functions
Head design affects drive control, clearance, appearance, and sealing pressure.
Hex Washer Head
- The standard for exposed-fastener roofing and siding.
- Delivers firm driver grip and even compression of the washer.
- Painted heads blend with panels for a clean finish. Choose the color that matches your panel set.
Pancake Head (Low Profile)
- Thin, wide head that sits low.
- Used on concealed-fastener systems (standing seam clips, certain siding systems) so seams close without a bump.
Flat/Countersunk Head
- Sits flush when a countersunk hole is provided.
- Handy for trims and accessories that call for a smooth surface.
Round Washer Head and Truss Head
- Round washer head: a raised pan with a built-in washer face for broader load spread without sticking up too far.
- Truss head: large-diameter, low-profile design that resists pull-through in thin materials.
A Note on Zip Screws
“Zip screws” are high-speed, self-piercing fasteners for thin metals and accessories. Both types of zip screws we offer feature a 1/4″ hex hi-hex, deep head design that maximizes grip and helps prevent the driver from slipping during installation. Use zip screws for trim and accessory attachment as specified, not as substitutes for structural panel fasteners unless the assembly calls for them.
Coating and Material Selection
Coatings and materials protect against corrosion and help avoid galvanic issues over the life of the roof.
Galvanized (Zinc-Plated) Carbon Steel
- The day-to-day standard for inland environments.
- Delivers roughly 20 to 30 years of corrosion resistance in typical climates.
- A budget-friendly option when paired with EPDM washers and correct installation.
Color-Coated Fasteners
- Polyester powder coat (around 2.5 mil) guards the head and matches panel colors for a clean look.
- A solid pick for exposed-fastener roofs and siding where appearance is important.
Stainless Steel (304 and 316)
- 304 stainless: Strong general corrosion resistance.
- 316 stainless: Molybdenum adds improved resistance in marine conditions.
- Choose for coastal projects (within about 3 miles of saltwater) or industrial atmospheres with corrosives.
Bi-Metal Fasteners
- Stainless body with a carbon steel drill tip blends corrosion resistance with quick, reliable drilling.
- Good fit for coastal jobs needing a Tek point to penetrate steel.
ZAMAC 5 Dome Cap Systems
- A cast zinc-alloy cap that fully covers the EPDM washer, blocking UV exposure.
- Provides premium longevity (often 40+ years of seal life) on high-end residential and commercial projects.
Galvanic Compatibility
- Match fastener and panel materials to limit galvanic corrosion.
- If mixing metals (for example, a stainless fastener in a carbon steel panel), consult the galvanic series and use isolators or sealants where needed.
Sealing Washers and Their Importance
A roof’s watertight performance often depends on a small component: the washer. Pick the right compound and set it correctly, and you’ll keep water out for decades.
EPDM vs. Neoprene
- EPDM is the current standard. It stays flexible and UV-resistant for 20 to 30 years and is bonded to the screw head so it doesn’t fall off during installation.
- Neoprene is older technology. It typically dries and cracks in 10 to 15 years and often becomes the first leak point. Avoid it on new projects.
Proper Compression
- Drive until the washer just begins to bulge past the head’s edge so it’s snug but not crushed.
- Over-tightening deforms the washer; under-tightening leaves gaps that turn into drips.
Installation Best Practices
- Use a screw gun with an adjustable clutch, not an impact driver. Impacts tend to over-torque and can snap heads, especially on #12 and #14.
- Keep the driver square to the panel. Angled screws don’t bite well and leave crescent-shaped gaps under the washer.
Periodic Inspection
- On exposed-fastener roofs, inspect at 1 to 2 years and then every few years after that. Replace any fasteners showing red rust, cracked washers, or wobble with the next larger gauge.
Don’t Forget the Basics: Placement and Spacing
- Drive in the flats on exposed-fastener panels.
- A baseline average is about 80 screws per 100 square feet on wood substrates; increase density in edge and corner zones per code and engineering.
- Follow the panel manufacturer’s pattern. More fasteners aren’t automatically better; location, bite, and even compression are what keep water out.
What To Buy, and How Supply Maverick Helps You Get It Fast
Whether you’re a contractor racing a deadline or a DIYer who wants it done right the first time, the correct fastener spec saves time on the ladder and headaches after the next storm. Work through this simple checklist:
- Identify the substrate: wood (sheathing, purlins) or steel (purlins, framing, deck).
- Choose the point and TPI: Type 17 with coarse threads for metal-to-wood; a Tek drill point with fine threads for metal-to-metal.
- Select the diameter by exposure and condition: #10 for standard residential, #12 for higher winds or replacements, #14 for maximum holding power. Reserve #9 for light-duty.
- Calculate the length: panel low (or stack thickness) + at least 1″ of penetration into the substrate.
- Pick the head and finish: hex washer head for exposed work, pancake head for concealed clips, painted heads to match your panel color set, and stainless or bi-metal where corrosion exposure warrants it.
- Plan quantity and spacing: start around 80 screws per square and adjust per wind zone, panel engineering, and local code (especially at edges and corners).
Supply Maverick makes the whole process faster. We stock the hard-to-find sizes, coatings, and head styles big-box stores skip. Because most orders placed before 12 p.m. EST ship the same day, you keep crews moving and projects on schedule. Backed by Mid-Michigan Metal Sales, our team brings deep product knowledge you can count on. We ship across the US, Canada, Australia, and New Zealand, offer wholesale pricing with bulk discounts, and provide Net 30 accounts for qualified business-to-business (B2B) buyers. Not sure between two sizes or coatings? Tell us your panel profile, substrate, wind zone, and environment and we’ll help you land on the right fastener the first time.
Final Installation Reminders You’ll Be Glad You Followed
Good fasteners in the right sizes solve half the equation. The other half is how you install them. Keep these closing tips handy:
- Keep the driver perpendicular to the panel so the washer seals evenly.
- Set the clutch on your screw gun to prevent over-driving.
- Skip the ribs; use the flats on exposed-fastened panels.
- Use EPDM washers and avoid neoprene on new work.
- Calculate length carefully: panel low + 1″ minimum penetration.
- Match drill point and TPI to the substrate: Type 17 for wood, Tek for steel.
- Replace stripped screws with the next larger gauge.
- Follow local code and manufacturer patterns; increase fastener density in edge and corner zones.
- In corrosive or coastal areas, step up to stainless or bimetal and consider ZAMAC 5-capped options for longer seal life.
- For project-specific details and code compliance, always consult a qualified local installer.
If you want help dialing in your exact spec, we’re ready. Supply Maverick’s knowledgeable team will help you choose the right diameter, length, thread, head, and coating for your panel profile and jobsite conditions so you can install once and move on. Most orders placed before 12 p.m. EST ship the same day, and we serve pros and DIYers across the US, Canada, Australia, and New Zealand. Add bulk discounts and available Net 30 terms for qualified businesses, and you’ve got a fast, reliable source you can count on. We’re Your Metal Supply Source.
Frequently Asked Questions
Can I reuse the same size when replacing old screws?
No. Follow the replacement rule and step up one gauge so threads bite fresh material (#10 → #12, #12 → #14). Dropping the same size into a wallowed hole usually leads to loose fasteners and leaks.
How tight should I drive roofing screws?
Tighten until the head seats flat and the EPDM washer just begins to compress. If the washer bulges wildly or splits (or the panel dimples), you’ve gone too far. Use a screw gun with a clutch.
Do I ever fasten into the rib on exposed-fastener roofs?
No. Drive in the flat/low of the panel. Screwing into the rib leaves a void under the washer that will leak over time.
What if my project is within a few miles of the ocean?
Upgrade corrosion protection. Choose 304 or 316 stainless, or bi-metal fasteners with stainless bodies and carbon steel drill tips. Use EPDM washers, and avoid dissimilar-metal contact that triggers galvanic corrosion.
Is #14 overkill on a typical home?
Often, yes. Most homes are well-served by #10s. #12s make sense for higher wind pressures or when replacing wallowed fasteners. Use #14 when exposure, substrate condition, or engineered specs call for the most holding power.
How many screws will I need?
A starting estimate is around 80 screws per 100 square feet for wood substrates. Corners and edges often need tighter spacing. Always follow the panel manufacturer’s layout and your local code or engineer’s schedule.
References
- Build Using Steel. “Cold-Formed Steel Framing.” Build Using Steel, August 2026. https://www.buildusingsteel.org/build-using-steel/cold-formed-steel-framing/
- Thermal-Tec. “Fastener Backout: Areas of Concern on Your Roof.” Thermal-Tec. January 31, 2022, August 2026. https://www.thermal-tec.com/fastener-backout-areas-of-concern-on-your-roof/